Tag Archives: Fashion Friday

Don’t Judge A Book By It’s Cover

Posted on

I love thrifting. No, more than love…I’m a little obsessed. I could go every day and never get tired of it. I don’t buy something every time I go, but it is über therapeutic to skim over clothes and look at so many different styles/eras of fashion in one place.

The best is when you find something “ugly” and give it new life.

I found this dress that I felt like had good bones, although I think my sister threw up in her mouth when she had to look at it while taking my picture. She really didn’t like it.

photo 2

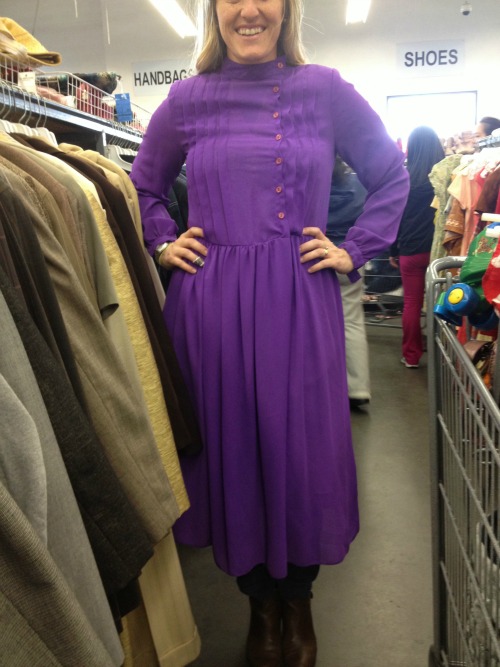
I had originally planned on shortening the sleeves and the hem of the skirt and modernizing the look.

Then I woke up and remembered that I have 2% skills in the DIY/sewing category and decided to just turn it into a midi skirt. Fortunately the waist line is elasticized, so all I had to do was cut above it to make a skirt.

photo 1

It is pretty sheer, so I have to wear it with a slip. The top also has a frayed finish to it, so I can’t tuck in a shirt. I someday hope to nice-ify it, but remember my DIY-lacking skills.

Despite that, I turned this dated, slightly funky dress into a trendy midi-skirt.

So, when you’re thrifting, make sure to #1-call me first so I can join you and #2-don’t quickly pass on something that might be “ugly”.

Happy Fashion Friday!

Sweater-Denim Jacket DIY

Posted on

I am so excited to have the lovely Kate guest posting today. Kate is a fabulous girl that just graduated from FIDM (the Fashion Institute of Design & Merchandising) and has her own awesome blog over at ayellowsparrow.com. Hope you enjoy this rad DIY that she’s put together for you. Have a wonderful Fashion Friday and don’t forget to leave Kate some comment love!

~~~~~~~~~~~~~~~~~~~~~~~~~~~~~~~~~~~~~~~~~~~~~~~~~~~~~~~

I have an obsession with two-tone jackets. I love leather sleeves or contrasting colors. The newest trend that I am drawn to is sweater/denim jackets. While in school, we saw this trend circulating around and I love it. But, sometimes its hard for me to let myself buy yet another denim jacket {I think 3 is plenty}. So, I decided to reconstruct some of my clothing items to make my own sweater-denim jacket! The process is relatively simple and I thought it would be a fun thing to share!

Sweater-Denim Jacket Tutorial:

What you need:

supplies2.72

1. A sweater you rarely wear but can’t seem to let go of completely.

2. A denim vest {you could also use an old denim jacket…just make sure to cut the sleeves off prior to the project}.

supplies1.72

3. Sewing scissors– make sure they are strong enough to cut a clean line through the sweater & denim.

4. Sewing pins.

5. Seam ripper {let’s hope we don’t need that, but mistakes do happen}

6. Sewing thread.

7. Thread clippers {this is not a necessity, but they are a nice tool to have}.

The Process:

1. Cut the sleeves off of the sweater about 1 inch away from the shoulder seam. Note: DO NOT cut off the shoulder seam! You need enough seam allowance to pin and sew.

cut.72

2. Pin the sweater armhole to the inside of the denim jacket armhole.

pin.72

3. Sew the sweater to the jacket with 1/4″-1/2″ seam allowance. Note: Stitch the sweater from the INSIDE of the jacket. Always try to keep your sewing line straight-this makes sewing curves much easier. 

4. Trim any extra threads away from the jacket.

5. Viola! Enjoy your new creation!

final.72

Sweater-Denim Jacket Styling:

sweaterjacket.72

Jacket- Denim GAP vest attached to Forever 21 sweater

Shirt- Billabong

Pants- Levi Strauss

Shoes- Converse All Stars

Purse-Forever 21

Adventures With Hair Chalk

Posted on

I’ve been pinning hair chalking pictures on Pinterest for about a year now. Finally this week I got around to actually doing it. My friend, Jen, my sister and I had a spontaneous hair chalking party.

Hair chalks are a great temporary option to add some color to your hair, especially if you have a professional job that won’t allow you to do “crazy” things with your hair. If so, try it for the weekend, then wash it out before you have to go back to work.

We bought our chalk online through a hair styling product company, but you could buy any set of soft pastel chalks from your local craft store (make sure it’s not the oil-based kind).

hair chalk options

Here are pictures of our before & during:

hair chalk

First you get the part of your hair you want to dye damp and then rub the chalk over it until it is the shade you want. The more you rub it, the denser a color you will have. Make sure to only rub from top to bottom or you’ll give yourself dreads. 😉

It may rub off, so make sure to wear a shirt you don’t mind getting dirty and put a towel over your pillow if you’re going to sleep on it.

When you’re done covering your hair with chalk, let it air dry or lightly blow dry it until dry. Then, style with either a flat iron or curling iron to set the color. Be aware that if you brush it, the color will likely brush out.

hair chalk 2

I love how it turned out, especially after being curled (I apologize for the yellowy bathroom-lit pictures, like I said it was a “spontaneous” party, so just go with it). I honestly think it shows up better in Jen’s hair since it’s darker, which I didn’t expect.

You could also just do the ends of your hair, like we did with my sister’s. I want to try this color next time.

hair chalk 3

Happy Fashion Friday!